Does your kit include unusable decals? Would you like to build your kit
in your favorite camouflage, but you have no necessary decals?
Prepare them yourself!
Below you can read how I do it.
I use vector graphics Corel Draw 9 to draw
all planned decals. I never use scanned pictures, because they have too
big raster for our small scale. I first redraw all pictures into vectors
all in required scale.
Important points:
The Laser Jet is not able to print white color so you have to split the
decal as follows:
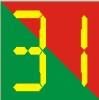
1) the decals without any white color and without any color base (some
markings, numbers atc.). These decals have to be printed on the clear
decal. (pic. No.1)
2) the decals able to be print on white decal paper and their shape is
easy to cut (pic. No.2)
3) the decals able to be printed of any one color decal. (pic. No.3)
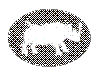
4) the worst variant of decals are decals with white color inside and
complicated shape,
not simple to cut them. The symbol of British 1st armored
division - black oval with the white rhino (pic. No.4). This decal has
to be printed on clear decal and the place on the kit to be applied on
has to be painted in white.
 |
 |
 |
 |
 |
|
pic.1a |
pic.1b |
pic.2 |
pic.3 |
pic.4 |
Then I print them on normal white paper. I use
HP LaserJet 4500 HP. I stick pieces of required decal paper on places
where the pictures are printed. Then I re-use the sheet of paper with
pieces of decal paper stuck to it, and then print again.
Finished decals printed on the decal paper have
same characteristics as standard decals.
All that I have written about printing above is valid only for color
decals, but not for white ones.
The article with the description of another way how to make your own decals
(also white!) will come in the article by Mitte from Tabor soon!
Happy modeling,
Sandman
|